User guidance for DAS
This user guidance is for defence agents accessing the Defence Agent Service. It provides step-by-step help and information for using DAS.
Accessing DAS
We are using Multi Factor Authentication (MFA) for secure access and to provide an additional level of protection to the DAS portal and those who use it. In order to apply the required security protocols, to access the system, a smartphone or tablet is required for MFA.
You can access DAS by direct login or by clicking the hyperlink in the notification email sent to you when electronic Disclosure, Documents for Service or List of Witnesses are shared.
Enter your login email credentials provided to you by COPFS.
ends in @extcopfs.scot
Then enter your secure password, complete MFA and you will be redirected to the DAS digital portal page.
Appointing a delegate and delegate display
Appointing a delegate
With your DAS Account, you can nominate delegates.
Please request delegate authority by email to servicedesk@copfs.gov.uk and provide the following information to allow the account to be set up:
- your full name
- your Law Society Membership number (find this on your practising certificate or ID/smartcard)
- the name of the firm you are employed by
- your business e-mail address
- your business contact telephone number
- the name of your delegate
- the job title of your delegate within the firm
- your delegate’s Law Society Membership number
- the delegate’s business email address
- the delegate’s business contact telephone number
Each subject legal representative within a firm will require to provide authority for each delegate they wish to nominate. This should be done by email from the designated disclosure email address.
Delegate Display
In Delegate Display, you can easily view your delegates and those you are delegated to.
On the landing page, click the defence agent name displayed at the top right of the screen, next to the “Sign out” option.
Once selected, this will take you to the “User Profile” page:

Below the “User Profile” section, you will see a further two sections.
“My Delegates” is a list of delegates who have access to your cases:

“Delegated to me” is a list of defence agents’ accounts/ cases that you have access to:

Please ensure these details are kept up to date. Contact COPFS IT Service Desk to add and remove delegates from your account.
DAS digital portal page
When you log in you will be taken to the DAS landing page.
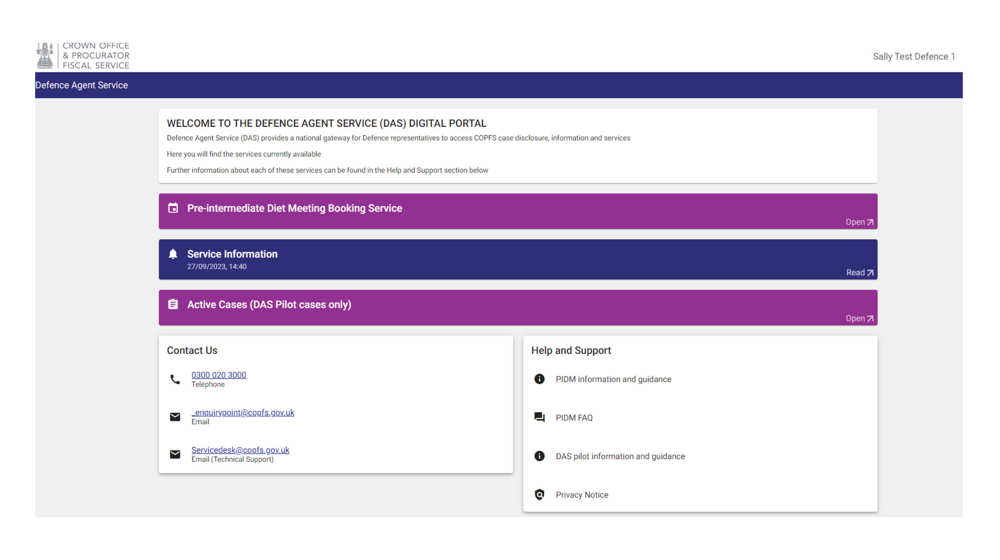
Pre-Intermediate Diet Booking (PIDM) service
Use this option for PIDMS.
Service information
Here you will see information and updates in relation to the Defence Agent Service.
Active cases (pilot)
This is where you can view a list of subjects or clients where we have received a Letter of Engagement from you and have disclosed or served case material to you as the recorded subject legal representative or as their delegate on DAS.
List of active cases
The list of active cases allows you to:
- re-order the columns to suit your business needs by hovering over the column headers and clicking on the arrow which appears
- apply a drop-down filter, where you can select a court. The unfiltered “Court” heading is defaulted to all courts
- filter for information across all columns - for example, if you search ‘Robert’, it will return names containing ‘Robert’ first name, last name or any names containing Robert like Robertson
Case information tab
Select the case you wish to view from the list of active cases.
You will be taken to the case tab screen.

This screen contains information about the Subject, their Court Appearances and confirms if there are additional subjects in the case.
It also allows you to access the witnesses tab, case material tab or the service documents tab for this subject.
The “Print Case Information” button allows you to print the information on screen or save it.
Witness tab
Select the tab and you will be taken to the witness list screen.

Select “Accept” on the screen to receipt access to the List of Witnesses. You will be agreeing to the terms described in the link. You will then be taken to the List of Witnesses.
The down arrow on the right hand side expands the list with the witness information.
You can filter on Witness Type to change views.
The “Print Case Information” button allows you to print the information on screen or save it.
Case material tab
Select the Case Material Tab to access productions and statements for the case.
Select “Accept” on the screen to receipt access. You will be agreeing to the terms described in the link.
You will see the any productions and statements disclosed to you.
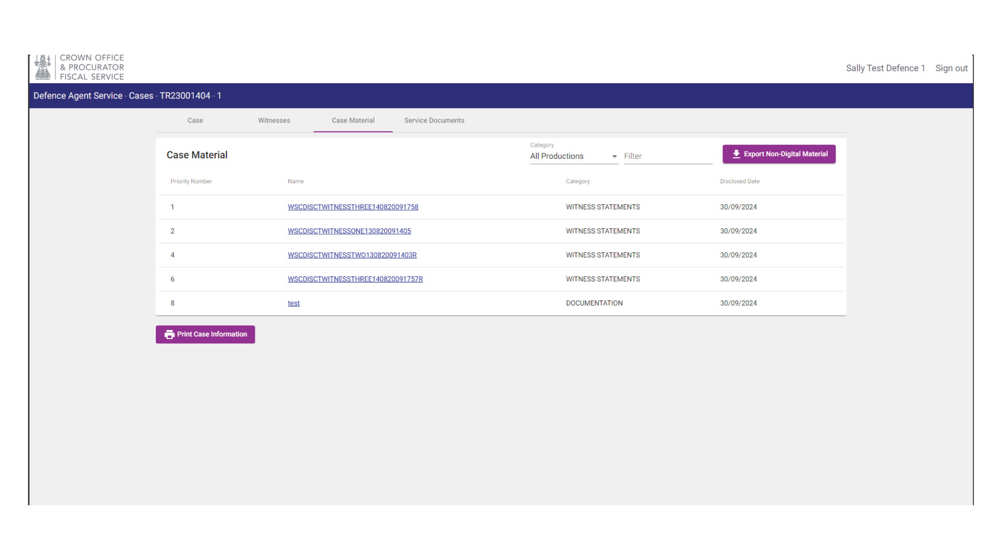
There are options to filter the list and search for a particular item by entering search criteria.
To access the file, click on the hyperlink:
The selected file will display in another window and you can return to the case material tab to open multiple documents if required.
The “Print Case Information” button allows you to print the information on screen or save it.
Evidence held in Digital Evidence Sharing Capability (DESC)
Evidence held in DESC will be accessed directly from DAS on the Case Material Tab. Select the hyperlink for the file:
You will be taken to the DESC page for the evidence file disclosed. You can download the file from here or return to the case material page and select “Export Digital Material”.
The “Print Case Information” button allows you to print the information on screen or save it.
Service documents tab
Select the Service Documents Tab to access service documents.
Select “Accept” on the screen to receipt access and agree to the terms described in the link. You will then be re-directed to the service documents page.
Any documents served will be listed. The “Print Case Information” button allows you to print the information on screen or save it.
You can filter to search for specific document types:
Select the hyperlink to view the document. The document will open in a new window
You have the option to save the document to your own device by selecting “Export Non-Digital Material”.
Download material
DAS allows you to download disclosure/service material or DESC evidence in bulk.
To download documents, select the icon on screen to “Export Non-Digital Material” for documents or “Export Digital Material” for DESC evidence.
In the pop-up window, you can “download all”, which is the default option.
Alternatively, select individual files by removing the tick from the “Select All” option and adding a tick to each file you want to download.
Once download is complete the files will be available in the downloads folder on your device.
Hard copy media
Certain cases may continue to have evidence on a disc or USB which has been collected and shared to COPFS by the reporting agency. Some items may continue to be provided to you by copy disc or USB. As the DESC programme rolls out, it is expected that the need for copies of discs and USBs will reduce over time.
Notice of Instruction (NOI)
Notice of Instruction (NOI) replaces the Letter of Engagement (LOE)
Submitting a NOI in DAS makes the process easier and more efficient. Once a NOI has been submitted, and all details provided can be successfully matched to those which COPFS hold, you will automatically be granted access to the case within DAS. Within minutes, access will be granted to any case related material, including disclosure and service documents, which has been made available to you.
It is important to note that the information contained in the NOI submission will validate against the information held within COPFS’s case management system. This information will be detailed on the complaint, petition or police undertaking. When completing the NOI, if the case/police reference number, or the date of birth, is incorrect the form will be immediately rejected after submission.
Submitting a NOI
To submit a NOI in DAS, select the ‘Active cases’ ribbon on the landing page to access your active case dashboard:

At the top right-hand-side of the dashboard, you will see three buttons:

· The ‘Create Notice of Instruction’ button will take you to the section to submit a new NOI for an accused.
· The ‘Create Notice of Instruction (FAI)’ button will take you to the section to submit a new NOI for fatal inquiry investigation (FAI) cases.
· The ‘Submitted Notices of Instruction’ button will allow you to view the status of all submitted notices by you and your delegates which have not yet been processed.
Create a new NOI
If you are submitting a NOI for a FAI, please see the section below this one.
Select the ‘Create Notice of Instruction’ button:

This will open a new page:

Enter the details as follows:
1. Select name of the defence agent from the drop-down box. This will give you options of all defence agents that you are delegated to:

2. Enter the PF reference number or police or agency refence number. You can only enter one reference number. Once a reference number is entered the other option won’t allow you to enter any details:

3. Enter the details of the accused. If you are representing a company, see steps 8-11.
4. Enter the accused forename(s).
5. Enter the accused surname.
6. Enter the accused date of birth. When this section is selected, you can choose to enter manually in the format ‘DD/MM/YYYY or open the calendar view to select a date:

7. After all the details are entered. Read the statement and select ‘Proceed’.
The statement reads:
‘By proceeding, I confirm that I am instructed by my client in the above case. Further, I confirm that I, and my firm, are bound by the Law Society of Scotland rules and guidance and in particular, in criminal cases, the Code of Conduct for Criminal Work. I also agree to accept service of any document which may require to be served on my client on this platform’.

1. If representing a company, select the check box above the accused detail boxes:

9. This will change the option from accused details to company name.
10. Enter the company name:

11. Read the statement and select ‘Proceed’.
You will then be asked to confirm that you wish to proceed:

Select ‘OK’ to continue, or ‘Cancel’ to return to the previous page.
If you are content to proceed, you will be directed to the final section where you will be notified that the NOI has been submitted to COPFS for review:

If all the information is correct, the NOI will be automatically accepted and updated in COPFS’s case management systems. This will give you access to the case information available within minutes of submission.
Create a new NOI for a FAI
Creating a NOI for an FAI follows a similar process. However, there are a few differences. The NOI for a FAI requires you to enter the name of the interested party:

Once the NOI form is completed, read the statement at the bottom of the screen and click proceed. The statement reads:
‘By proceeding, I confirm that I am instructed by my client in the above case. I undertake that:
a. Material disclosed, or any information contained in it, will not be used or disclosed other than for the purpose of the preparation and conduct of the inquiry.
b. Such material will not be provided to the interested party represented by me or to any other party without the express agreement in writing of the Procurator Fiscal; and
c. In the event that I cease to represent the said interested party during the preparation or conduct of the inquiry, any such material will be returned to the Crown.’
Once ready to proceed click the ‘Proceed’ button.
Failed validation of NOI
There are several ways in which the NOI validation could fail. The main reason for failure is that incorrect information has been submitted in the NOI form.
You will be notified of the reason for a failed validation by email and by a notification about the status in the ‘Submitted Notices of Instruction’ section. These notifications are known as alerts.
Alerts
Only a handful of failed validations will automatically reject. Alerts will notify you of a failed validation.
If the NOI is rejected, you may need to resubmit it. If the validation continues to reject the NOI, you will need to contact COPFS to discuss, as COPFS may hold the different data for the accused.
The following alerts are automatically triggered for a failed validation:
NOI - Case number doesn’t exist.
If the alert says that the case number does not exist, it may be that COPFS have not yet received the case into the case management system.
NOI - Date of birth doesn’t match.
If you believe you have submitted the correct date of birth, please contact COPFS to discuss, COPFS may hold different information in the case management system.
NOI - Access already granted.
This alert will appear if access has already been granted in a case that you have submitted a NOI for. You should check your list of active cases to see if you already have access. It may be that the case has been rolled up with another case that you already have access to, the case has been transferred, or you have been given access to this case by other means.
NOI - No subject found in case / NOI - No company found in case.
On both occasions the name of the accused or company is not correct and cannot be found in the case management system. This could be because you have selected ‘Company’ and COPFS systems have an accused person, or you have input details for an accused person and COPFS systems have a company in this case.
NOI - Subject status not active
This alert means that details of the accused provided for the case number and date of birth are not active on the COPFS system. A recent marking in the case may have changed this status. You should contact COPFS to resolve this.
NOI - Date of death doesn’t match.
The date of death must match the information held in the case management system to validate successfully.
NOI ‘Under Review’
If the submitted NOI does not automatically approve or reject, you will see the submitted NOI with the status ‘Under Review’:

When the status is ‘Under Review’, COPFS needs to perform an additional check on the NOI form to process it into the case.
For example, if the case number and the date of birth are correct but the accused forename and surname do not match the data held in the case management system, COPFS staff will manually check the data.
In situations where there is more than one accused in the same case with the same date of birth and similar forename/ surnames, COPFS will carry out a manual check and may contact you to confirm details.
Once reviewed, COPFS will accept or reject the submitted NOI.
You will be notified about both. However, in the instance of the NOI being rejected, you may need complete the NOI again or contact COPFS for further support.
View ‘Notice of Instruction’
To view your successful NOI submission, select the case from your active cases dashboard.
In the case tab, you will see an option at the top right-hand corner to ‘View Notice of Instruction’.
Once selected, you can view the NOI that was submitted:

If the NOI was reviewed by COPFS before being accepted, this NOI will also show any details that were not correct:

Withdrawing representation
There are two areas where you can now withdraw representation in DAS.
The first is located on the ‘Case’ tab when you are in the case.
At the top right-hand corner of the subject box, you have the option to withdraw representation:

Select the ‘Withdraw representation’ button. You will be presented with a message confirming your selection:

Select ‘Ok’, to confirm the withdrawal.
Once completed, you will not receive new case material for this case, and the case will shortly be removed from your active cases list.
You can also withdraw representation in the active cases dashboard.
Click the ellipsis at the righthand side of the case line:
The option to withdraw representation will appear:

Once selected, you will receive a message to confirm, and the case will be removed from your active cases dashboard

Account changes
Delegates
COPFS are providing delegate access on the basis that authority is provided and managed by the nominated subject legal representative. Where delegates access requirements change COPFS must be notified with immediate effect by email the COPFS IT Service Desk to servicedesk@copfs.gov.uk
Subject legal representative
When COPFS receives notification of any changes to the nominated subject legal representative, we will update records in DAS and provide the relevant access to the new defence agent.
Online access will be removed immediately for the previous defence agent, and they will no longer have access to the information within DAS.
Any printed or downloaded material must be securely disposed of in accordance with disclosure obligations.
Mobile devices
If you change your device MFA will continue to be linked to your old phone or tablet. For security reasons, if you want to use a new device, COPFS will take steps to revoke and re-register your MFA sessions. To do this contact the COPFS IT servicedesk@copfs.gov.uk
Feedback and support
Contact us at servicedesk@copfs.gov.uk
Provide feedback to us at defenceagentservice@copfs.gov.uk